What do I need to make a bow?
Many tutorials and buildalongs on the web assume the bowyer (or bow maker, whichever you prefer) already has a great trove of tools available to make that precious first bow.
Of course, not everyone has a fully kitted out workshop with all the best equipment. Some people have almost nothing but enthusiasm and some plans for a fearsome longbow or elegant flatbow. This article is aimed at just such a bowyer: the person who is keen to make a bow but has little hardware to get started.
Fortunately, there are only a few tools which can be considered truly essential for making a longbow or flatbow. With the tools in this article, you certainly wonât get a bow to tiller stage as quickly as with a bandsaw and belt grinder, but it will be accurate, and the end product will look identicalâ¦provided your hand is steady.
Bowyery sees several distinct phases of wood working between board from the timber shop to finely crafted weapon. As the piece of wood goes from board to finished bow, the amount of wood removed at each stage becomes less and less: large chunks to begin with; fine dust at the end.
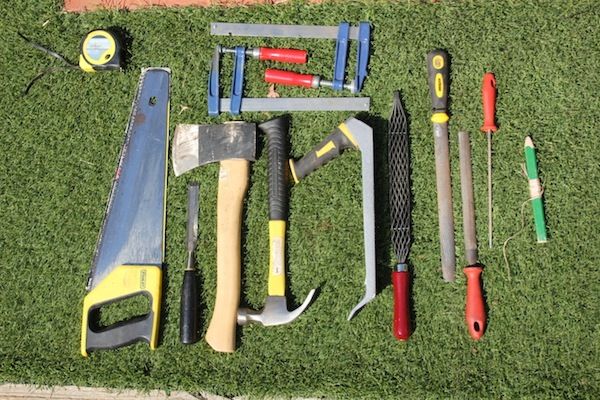
This picture shows many more tools than you would actually need to make a bow from start to finish. I've included this many tools to show some alternatives. From left to right: measuring tape; carpenterâs saw (a mitre saw works fine too); chisel; hatchet; two F clamps; Surform Rasp; Japanese Rasp; half round rasp; half round file; rat-tail file; and, a pencil.
Without a bandsaw, it is reasonably easy to cut out the profile of a longbow or flatbow. Start by drawing on your pattern:

And then clamp it to some solid, reliable object. Almost anything will do. You don't need a workbench, but don't get caught doing this to your kitchen bench:

Begin with your hand saw, cutting at right angles to the long axis of the board to within 3 - 5 mm from your pencil lines:

Keep the distance between cuts just a little wider than your widest chisel.

Then use the chisel and a hammer to knock out the tabs youâve created:


Don't chisel any further than the shallowest cut to each side of the tab to be knocked out.
When you're done, the bow edge will appear sort of "pixelated", or stepped.

So it's back to the clamps. I prefer a Japanese rasp for this, as it has two sides of different coarseness, and has a truly great appetite for wood. The finer side can be used to remove very small amounts of wood indeed, almost as fine as a file, but with less clogging.

Before long, the width of the bow is realised:

Alternatively, you might try using a hatchet, with the end of the bow resting on a board or stump. Only ever work from handle to tip of the bow, and donât try to take all the wood off in one go. To do so is the way to disaster.

This same process can be followed for defining the taper of the thickness of your bow. If using a hatchet, be several orders of magnitude more careful.
When you get to the tillering stage, the Japanese rasp will come into its own. It can remove large or small quantities of wood, and is resistant to clogging. However, if you already have them, rasps and files work wonders too.
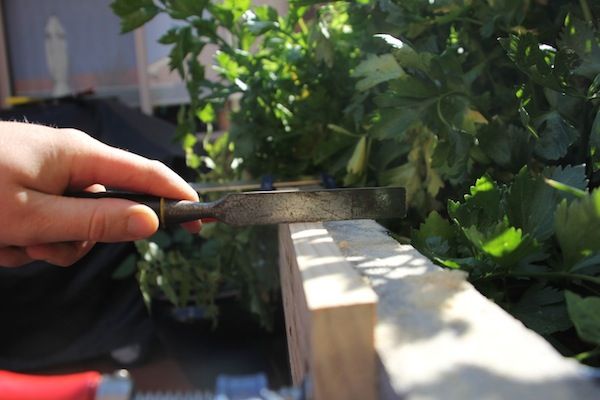
Eventually you will be removing very small amounts of wood, such as when fine tuning the almost perfect tiller. You can re-purpose tools already used to accomplish this. Whether using a file or fine side of a Japanese rasp, you will be left with a wood surface that is covered in fine striations:

Chisels, even cheap ones, are usually made of reasonably good steel, and the machined edges make for terrific wood scrapers. Used (two handed, unlike below) on edge, a chisel can be used to remove file marks and other small blemishes:
Nice and smooth:

Such a surface is prime for waxing. If you have it, you can use sandpaper to make the bow super-smooth. However you might be of the opinion that bows are for shootin'; not for lookin', and this is a perfectly acceptable opinion to have.
So how much would all this cost? A visit to your local hardware shop or specialty woodworking shop of choice should reflect the below approximations
- Saw: $9
- Japanese rasp: $35
- Hatchet: $20
- Chisel: $12
- Half round rasp: $15
- Surform rasp: $25
- Half round file: $15
- Rat tail file: $5
- Measuring tape: $8
- Clamps: $9 each
- Hammer: $9, or use a brick
Remember you donât need all of these things. If I were buying a bow making kit from scratch, Iâd get: a saw, Japanese rasp, half round file, rat tail file, measuring tape, chisel, clamps and hammer for a total of $103. If this is a bit steep, chances are you might get some of these cheaper at garage sales, or be able to borrow them from friends/relatives. Either way, itâs far cheaper than forking out hundreds of dollars for more equipment like bandsaws.